Chapter 5: Booting Linux on an FPGA — A Practical Troubleshooting Guide
The previous article walked through every layer of the boot flow: Boot ROM WFI wait, UART-TSI loading, OpenSBI M-mode initialization, Linux S-mode startup, and HTIF console IO forwarding. This article gets hands-on and brings the entire chain to life on real hardware.
What you'll find here is a correct, directly reproducible procedure — the steps are laid out first, and the pitfalls along with their root causes are collected in a dedicated section at the end for reference when something goes wrong.
Board used in this article: Digilent Nexys Video (Artix-7 XC7A200T).
Other FPGAs can reproduce this as well. The recommended specifications are roughly Artix-7 200T-class logic resources, external DDR, and a USB-UART interface — though the resources are not fully utilized, so smaller boards may work depending on how aggressively you trim the Config. The software-side modifications are fully portable; on the hardware side, you need to write a new Chipyard Config — see the adaptation notes at the end of this article for details.
As discussed in the theory article, running Linux on an FPGA consists of two independent tasks: on the hardware side, synthesize the Verilog into a Bitstream and program it into the FPGA; on the software side, build fw_payload.elf and transfer it into DDR to run. This article walks through both tasks in that order. The operating environment is split into two parts: synthesis and programming are done in Vivado on Windows, while software building and loading are done under WSL2. The Nexys Video has two USB ports — the PROG port connects to Vivado and the UART port connects to WSL2, so there is no conflict.
1. Building the Linux Image
If you are using the precompiled
fw_payload.elffrom the companion repo, skip Sections 1 and 2 and go directly to Section 3.
The Nexys Video has only one UART, and it is occupied by the UART-TSI protocol — it must both transfer programs and forward IO, leaving no spare UART for a Linux console. This is the problem this section solves: make the Linux console go through SBI ecalls, piggybacking on OpenSBI's HTIF output, and reusing the same UART line.
If your board has two independent UARTs (e.g., the VCU118), you can dedicate one of them as a standard serial console for Linux (console=ttyS0), in which case the modifications in this section and the next are unnecessary — the configuration is also much simpler, and you can explore that on your own.
Specifically, in Chipyard's default FireMarshal image, the Linux kernel's console is configured as console=ttyS0, but the Nexys Video configuration (RocketNexysVideoConfig) uses WithNoUART, so there is no UART device available on the Linux side. We need to modify the kernel configuration to make Linux use SBI console output, then recompile and repackage.
1.1 Modifying the Kernel Configuration
hvc0 is Linux's SBI virtual console driver — Linux, running in S-mode, uses ecall to ask OpenSBI (M-mode) to output on its behalf, and OpenSBI then forwards the data to the host via HTIF. This path does not depend on any board-level UART hardware; as long as OpenSBI is running, it works.
Modify the following lines in software/firemarshal/boards/prototype/linux/.config (you can also use the scripts/config tool to set each item individually):
CONFIG_RISCV_SBI_V01=y
CONFIG_HVC_RISCV_SBI=y
CONFIG_SERIAL_EARLYCON_RISCV_SBI=y
CONFIG_CMDLINE="console=hvc0 earlycon=sbi loglevel=4 nowatchdog"
CONFIG_CMDLINE_FORCE=y
The reason for nowatchdog: the FPGA clock runs at only 50 MHz, one to two orders of magnitude slower than a real chip. Decompressing the initramfs during kernel boot takes a long time and triggers the soft lockup watchdog alarm, so this parameter simply disables it.
1.2 Compiling the Kernel
The cross-compilation target is RISC-V 64-bit. The output is Image (an uncompressed kernel binary), which will be packaged into OpenSBI later:
cd software/firemarshal/boards/prototype/linux
export ARCH=riscv
export CROSS_COMPILE=riscv64-unknown-linux-gnu-
make olddefconfig && make -j$(nproc) Image
Compilation takes approximately 15–30 minutes.
1.3 Packaging fw_payload.elf
OpenSBI's fw_payload mode embeds the Linux kernel directly into the firmware, producing a single ELF file containing the complete boot chain. The host only needs to send this one file; after the FPGA powers on, execution begins at the OpenSBI entry point (0x80000000), and once initialization is complete, it automatically jumps to the kernel entry point (0x80200000):
cd software/firemarshal/boards/prototype/firmware/opensbi
make PLATFORM=generic \
     CROSS_COMPILE=riscv64-unknown-linux-gnu- \
     FW_PAYLOAD_PATH=../../linux/arch/riscv/boot/Image \
     -j$(nproc)
The output file is at build/platform/generic/firmware/fw_payload.elf, approximately 27 MB.
2. Fixing OpenSBI
In lib/sbi/sbi_ecall.c, OpenSBI validates the return value of all SBI calls against an error code range, expecting it to be within [-8, 0]. However, the normal return value of SBI_EXT_0_1_CONSOLE_GETCHAR (keyboard input) is the character value that was read (0–255), or -1 if no character is available — both of which are incorrectly flagged as out-of-range error codes, causing all key presses to be silently dropped.
The companion repo's patches/ directory contains a ready-made patch file:
cd software/firemarshal/boards/prototype/firmware/opensbi
git apply /path/to/patches/opensbi-sbi_ecall-getchar-fix.patch
The patch modifies a single conditional to skip the error code validation for CONSOLE_GETCHAR:
// Before
if (ret < SBI_LAST_ERR || SBI_SUCCESS < ret) {

// After
if (extension_id != SBI_EXT_0_1_CONSOLE_GETCHAR &&
    (ret < SBI_LAST_ERR || SBI_SUCCESS < ret)) {
After applying the patch, re-run the build command from Section 1.3 to regenerate fw_payload.elf.
3. Programming the Bitstream
The Bitstream is the FPGA configuration file produced by Vivado synthesis. Once programmed, the FPGA becomes a RISC-V processor board running a Rocket Core. Here we use RocketNexysVideoFastUARTConfig, which raises the UART baud rate from 115200 to 921600 bps on top of the standard Rocket configuration, reducing the time to load the 27 MB image from 32 minutes to approximately 4 minutes.
The Bitstream can be downloaded from the companion repo's prebuilt/ directory, or you can synthesize it yourself with Vivado following the procedure in Chapter 3 (which takes anywhere from tens of minutes to an hour).
Programming steps:
- Connect the PROG port
- Open Vivado → Hardware Manager → Open Target → Auto Connect
- Right-click the device → Program Device, and select
NexysVideoHarness_FastUART.bit - Wait for programming to complete and confirm that the DONE LED lights up and LD0/LD1 begin alternating flashes
- Disconnect the PROG port and switch to the UART port
4. Loading and Booting
With all preparation complete, the operation is just two steps: press reset, run the tool.
First, pass the UART port through to WSL2. In a Windows PowerShell (Administrator) window:
usbipd list          # Find the BUSID of the UART port
usbipd attach --wsl --busid 4-3   # Use the actual BUSID
In WSL2, set permissions:
sudo chmod 666 /dev/ttyUSB0
After re-plugging, the BUSID may change and you will need to re-attach.
Next, press the CPU_RESET button to make the Rocket Core re-execute from the Boot ROM and enter the WFI wait state (as described in the theory article). Then use uart_tsi_interactive to load the program — this is a tool we wrote ourselves; it is not in the upstream Chipyard repository. The source code is in the companion repo's uart_tsi_interactive/ directory. The original uart_tsi tool's main loop blocks while waiting for user input, which halts UART processing and makes target-side output invisible — it is unusable for running interactive Linux. Our version uses a separate thread to read terminal input and forwards it to fesvr via a pipe, while the main loop continuously processes UART traffic, enabling true bidirectional real-time interaction.
The tool uses the UART-TSI protocol to write fw_payload.elf segment by segment into the FPGA's DDR. Once the write is complete, it writes a software interrupt to the CLINT to wake the processor, and OpenSBI and Linux start automatically. The tool then switches to console IO forwarding mode — it must not be closed while running — it is the only IO channel between the host and the FPGA, and closing it means losing all visibility.
# Press CPU_RESET first, then immediately run:
./uart_tsi_interactive \
    +tty=/dev/ttyUSB0 \
    +baudrate=921600 \
    +noecho \
    fw_payload.elf
The transfer prints loading progress for each ELF segment. After about 4 minutes, the OpenSBI banner appears, and Linux finishes booting in another 1–2 minutes.
5. Results
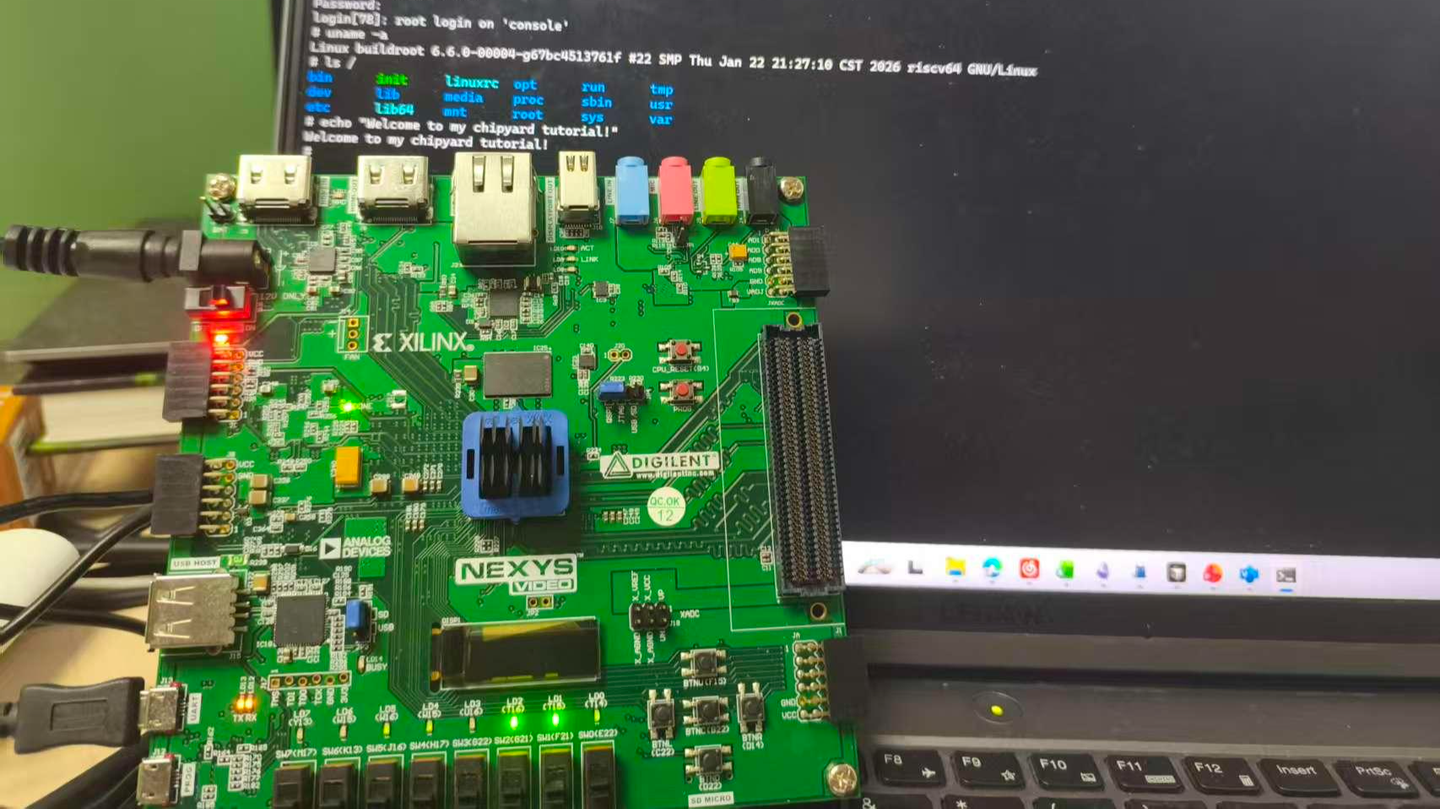
At this point, the Rocket Core generated by Chipyard is running a fully interactive Linux on the FPGA.
6. Pitfalls and Troubleshooting
Recorded in the order they were actually encountered, for debugging reference.
Pitfall 1: OpenSBI runs fine, but Linux produces absolutely no output after booting
Symptoms: The OpenSBI banner appears and shows a jump to 0x80200000, after which the terminal goes silent — nothing is printed.
Root cause: The definition of RocketNexysVideoConfig contains a line new chipyard.config.WithNoUART, so the UART hardware is exclusively occupied by UART-TSI, and there is no UART device on the Linux side at all. The console=ttyS0 in the kernel command line points to a non-existent device, leaving the kernel with nowhere to output. The HTIF that OpenSBI uses is only effective in M-mode; after switching to S-mode, Linux cannot access it.
Fix: Switch to hvc0 (the SBI virtual console). Linux uses SBI ecalls to request output from OpenSBI, which then forwards it to the host via HTIF, bypassing the UART hardware limitation. See the kernel configuration changes in Section 1.
Pitfall 2: The login prompt appears, but key presses have no effect and errors are reported
Symptoms: buildroot login: displays normally, but after typing any character, the following is printed:
sbi_ecall_handler: Invalid error 114 for ext=0x2 func=0x0
Root cause: OpenSBI performs a uniform error code range validation ([-8, 0]) on the return value of all SBI ecalls. However, the semantics of SBI_EXT_0_1_CONSOLE_GETCHAR are to return the character value that was read (e.g., the character 'r' corresponds to 114), not an error code. OpenSBI misidentifies this as an illegal return value and replaces it with SBI_ERR_FAILED, so the Linux side never receives the character.
Fix: In sbi_ecall.c, skip this validation specifically for CONSOLE_GETCHAR. See the patch in Section 2.
Pitfall 3: Everything works, but every load takes half an hour
Symptoms: Linux is fully interactive, but every time you press CPU_RESET and reload, you have to wait 32 minutes.
Root cause: The default Bitstream's UART baud rate is 115200 bps. fw_payload.elf is approximately 27 MB, with about 15 MB of ELF LOAD segments that actually need to be transferred. Theoretical transfer time: 15 MB × 8 bits / 115200 ≈ 1040 seconds. With protocol overhead, this comes to about 32 minutes.
Fix: Add RocketNexysVideoFastUARTConfig, which raises the baud rate to 921600 bps (8x). This brings transfer time down to approximately 4 minutes. It requires re-synthesizing the Bitstream — a one-time cost — after which every reset cycle takes only 4 minutes.
7. Adapting to Other FPGAs
All changes from Sections 1 and 2 (Linux kernel configuration, OpenSBI patch) are board-independent and can be applied as-is.
What you need to write for your specific board is the Chipyard FPGA Config. A Config is essentially a piece of Scala code that describes "what the processor on this board looks like and how the peripherals are connected." Taking this article's RocketNexysVideoConfig as an example, its structure looks like this:
class RocketNexysVideoConfig extends Config(
  new WithNexysVideoTweaks ++   // Board-level config: DDR, UART-TSI, clock frequency
  new chipyard.config.WithBroadcastManager ++
  new chipyard.RocketConfig)    // Processor core config
Within WithNexysVideoTweaks, board-level parameters such as the UART baud rate, DDR size, and clock frequency are specified. When switching to a different board, this is the main part that needs to change: where DDR is mapped, how large it is, which pins the UART uses, and what the clock frequency is in MHz. The processor core itself (RocketConfig) does not need to be modified.
In addition to the Config, you also need an XDC constraint file that tells Vivado which physical pin on the chip corresponds to each signal — UART TX/RX, DDR data lines, clock input, and so on. This information can be found in the board's manual, and Chipyard provides ready-made constraint files for each officially supported board in the fpga/fpga-shells submodule.
Once you have written the Config and XDC, re-synthesize with Vivado to generate the Bitstream, and the rest of the workflow is identical to what is described in this article.
Chipyard currently provides ready-to-use XDC files and Configs for the following boards: Nexys Video (this article), VCU118 (has an independent UART + SD card slot, better suited for a full Linux setup), ZCU106, and Arty A7 (fewer resources, better suited for bare-metal applications). Other boards are entirely usable as well — you just need to write the XDC constraint file and Config yourself.
8. Companion Code
All changes from this article are in the companion repo:
uart_tsi_interactive/: Full source code + Makefile for the interactive loading toolpatches/: OpenSBI patch, Linux kernel configuration changes, FastUART Configs.scala snippetprebuilt/: Precompiledfw_payload.elfand Bitstream, downloadable from the Releases page
GitHub: https://github.com/mikutyan4/chipyard-linux-nexys
The kernel configuration changes, OpenSBI patch, FastUART Config, and other modifications discussed in this article were all developed with the help of AI programming tools. If you need to adapt things to your own environment during reproduction, feed this article along with any error messages to an AI assistant — it will most likely know what to change.
9. Summary
Looking back, the difficulty of this article lies not in any single step — each step on its own is straightforward. What makes it hard is that the entire chain spans so many layers: Chisel hardware configuration, Vivado FPGA synthesis, Linux kernel drivers, OpenSBI firmware, UART protocol, ELF loading mechanisms... When something goes wrong at any layer, the symptoms all look roughly the same: no output, or it hangs. Pinpointing the root cause requires at least a basic understanding of how each layer works.
But that is precisely the value of doing this. Textbooks cover privilege levels, SBI, and device trees as abstract concepts. But when you personally change console=ttyS0 to console=hvc0 and watch Linux's output go from nothing to a full boot log, the SBI ecall mechanism and the M-mode/S-mode boundary stop being exam questions and become something you truly understand after an afternoon of debugging.
I recommend actively using AI programming tools like Copilot, Claude Code, and Cursor for this kind of systems-level debugging. Cross-layer problems like "OpenSBI is reporting a strange error code" or "Linux has no output after booting" are incredibly inefficient to track down by searching through tens of thousands of lines of code on your own. But describing the symptoms to an AI can quickly narrow down the investigation scope and pinpoint exactly which layer and which configuration is at fault.
Next up: Chapter 6 — Gemmini: Running Matrix Operations on an FPGA with a Hardware Accelerator. Building on the Linux-capable setup, we integrate the Gemmini accelerator to run matrix operations in hardware on the FPGA's RISC-V core — the true starting point for LLM accelerator research.